How important is the idler in providing stability and support to the excavator?

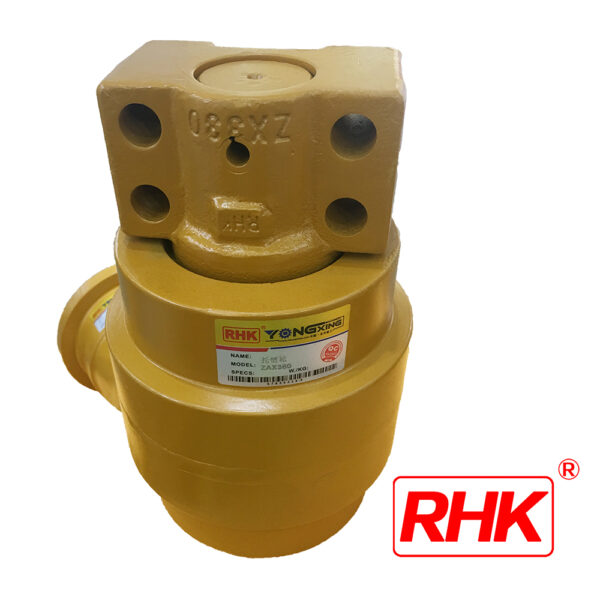
The idler is a crucial component in providing stability and support to an excavator. It plays a significant role in the excavator’s undercarriage system, which supports the machine’s weight and facilitates its movement.

Here’s why the idler is important for stability and support:

Weight Distribution: The idler helps distribute the weight of the excavator evenly across the tracks or tracks and rollers. It is typically positioned at the front of the undercarriage and acts as a support point. By properly distributing the weight, the idler contributes to the overall stability of the excavator, preventing excessive stress on specific areas and improving balance.

Track Tension: The idler assists in maintaining proper track tension in the undercarriage system. It acts as a tensioning point for the track and allows for adjustment to achieve the desired tension. Proper track tension is crucial for maintaining stability during operation, preventing track slippage, and ensuring efficient power transmission.

Track Alignment: The idler helps guide the track and maintains proper alignment with other undercarriage components, such as the sprocket and rollers. It ensures that the track remains in its correct position and moves smoothly along the undercarriage. Proper track alignment is essential for stable and controlled movement, reducing uneven wear and improving overall performance.

Ground Contact: The idler maintains constant ground contact for the excavator’s tracks. It supports the weight of the machine and ensures that the tracks remain in contact with the ground surface. This continuous contact enhances traction, stability, and maneuverability, especially when operating on uneven or challenging terrain.

Absorbing Shock: The idler helps absorb shocks and impacts encountered during operation. As the excavator moves over rough terrain or encounters obstacles, the idler acts as a shock absorber, dampening vibrations and reducing the impact transmitted to the undercarriage. This feature contributes to stability, minimizes stress on the undercarriage components, and enhances operator comfort.

Durability and Longevity: The idler’s design and construction are crucial for its durability and long service life. It is subjected to significant loads, impacts,HITACHI ZX360 Excavator Undercarriage Part Carrier Roller supplier and harsh operating conditions. A robust and well-maintained idler ensures reliable performance, reduces downtime, and contributes to the overall longevity of the excavator.

In summary, the idler is vital for providing stability and support to an excavator. It helps distribute the weight evenly, maintains proper track tension and alignment, ensures ground contact, absorbs shocks, and contributes to the overall durability and longevity of the machine. Regular inspection, maintenance, and proper adjustment of the idler are essential to optimize its performance and ensure the excavator’s stability during operation.

What is the typical lifespan of a HITACHI EX35 Excavator Undercarriage Part Idler?

The typical lifespan of a Hitachi EX35 excavator undercarriage part, such as the idler, can vary depending on various factors, including the operating conditions, maintenance practices, and usage intensity. It’s important to note that lifespan estimates are approximate and can vary significantly.

Under normal operating conditions and with proper maintenance, a well-maintained idler for an excavator like the Hitachi EX35 can last anywhere from 3,000 to 6,000 working hours. However, it’s important to monitor the condition of the idler regularly and replace it if signs of excessive wear or damage are observed.

Factors that can affect the lifespan of the idler and other undercarriage components include:

Operating Conditions: Harsh operating conditions, such as working in abrasive environments, rocky terrain, or extreme temperatures, can accelerate wear on the idler. These conditions may require more frequent inspections and replacement of the idler.

Maintenance: Regular maintenance practices, including proper lubrication, inspection, and adjustment of the idler, can significantly extend its lifespan. Maintaining proper tension in the track and ensuring the idler is free from debris and contaminants can help prevent premature wear.

Usage Intensity: The intensity of usage, including the frequency and duration of operation, can impact the lifespan of the idler. Heavy usage or continuous operation can subject the idler to more stress and wear, potentially shortening its lifespan.

Operator Practices: Operator habits and practices, including operating the excavator within recommended limits, avoiding unnecessary impacts or excessive speed, and practicing smooth operation, can contribute to prolonging the lifespan of the idler.

It’s important to consult the manufacturer’s recommendations and guidelines for specific maintenance intervals and replacement schedules. Regular inspections by qualified technicians can help assess the condition of the idler and determine when it may need replacement.

What are the recommended safety gear and containment methods for ceramic fiber insulation density?

Here are some recommended safety gear and containment methods for working with ceramic fiber insulation density:

Safety Gear:

NIOSH-approved respirator mask rated for synthetic vitreous fibers – protects from airborne fibers
Disposable coveralls – to prevent fibers from sticking to clothes
Gloves – thick and tight-fitting to prevent minor cuts exposing skin
Goggles – to protect eyes from possible fiber irritation

Containment Methods:

Plastic sheeting – to floor and walls around work area to catch loose fibers
Tape – use duct or canvas tape to seal all plastic seams and openings
Spray-on encapsulant – mist area during cutting to bind airborne fibers
Wet rags – have damp cloths available to wipe up any dust/fibers
Sealable bags – properly bag and seal all scrap material and used PPE
Ventilation – use fans tocirculate air and remove any suspended fibers
Proper clean-up – never use compressed air, wet-wipe all surfaces
Proper training is critical for safe handling. Do not work with ceramic fibers if conditions cannot maintain constant containment and exhaust ventilation. Consult product SDS for any additional manufacturer recommendations as well.

Can you recommend any specific sunglasses styles for a round face shape?

If you have a round face shape, there are several sunglasses styles that can complement your features and provide a balanced look.

Here are some recommendations:

Angular Frames: Look for sunglasses with angular or geometric frames to add definition and structure to your face. Styles such as rectangular, square, or cat-eye frames can help create the illusion of more angular facial contours.

Wayfarer: The classic wayfarer style features a slightly angular shape with a wide frame. It offers a timeless and versatile look that suits many face shapes, including round faces. Wayfarer sunglasses can provide a stylish and balanced appearance by adding angles to your facial features.

Rectangular Frames: Opt for rectangular frames that are wider than they are tall. The straight lines and sharp angles of rectangular sunglasses can help elongate your face and create a more balanced look.

Browline Frames: Browline sunglasses feature a distinctive upper frame that mimics the shape of eyebrows, while the lower part is thinner or rimless. This style draws attention upward and adds a sense of verticality to your face, making it a suitable choice for round face shapes.

Cat-Eye Frames: Cat-eye sunglasses have upswept outer edges that accentuate the cheekbones and elongate the face. This style adds a touch of retro glamour while providing a flattering contrast to round face shapes.

Oversized Frames: Consider oversized sunglasses with wide frames that cover a significant portion of your face. They can help create the illusion of a slimmer face and provide a balanced look with round features.

Angular Aviators: Aviator sunglasses with angular frames can be a good option for round faces. The distinctive shape, with its wider top and tapered bottom, adds angles to your face, helping to balance the softness of round features.

Remember, these suggestions are general guidelines, and personal style preferences play a significant role in choosing sunglasses. It’s always a good idea to try on different styles and see which ones you feel most comfortable and confident wearing.

What are some popular colors or patterns for sunglasses that would complement a round face shape?

When it comes to colors and patterns for sunglasses that complement a round face shape, there are a variety of options to consider. Here are some popular choices:

Dark or Bold Colors: Deep, dark shades such as black, brown, navy, or deep tortoiseshell can help add contrast and definition to a round face. These colors provide a sleek and sophisticated look while helping to create a more angular appearance.

Contrasting Frames: Choosing sunglasses with frames that contrast with your skin tone can provide a flattering effect. For example, if you have a light complexion,sunglasses from china darker frames can create a striking contrast, while lighter frames can complement darker skin tones.

Translucent or Clear Frames: Translucent or clear frames can be a stylish choice for round faces. These frames offer a modern and trendy look while maintaining a sense of lightness and not overpowering the facial features.

Tortoiseshell Patterns: Tortoiseshell patterns are a classic choice that can add depth and visual interest to sunglasses. The mixture of warm brown and amber tones in the pattern can complement the softness of a round face shape.

Gradient Lenses: Sunglasses with gradient lenses feature a darker tint at the top that gradually lightens towards the bottom. This style can be particularly flattering for round faces as the darker upper portion adds definition to the upper face while the lighter lower portion maintains a balanced look.

Mirrored Coatings: Mirrored sunglasses have a reflective coating on the outside of the lenses, which can add a touch of boldness and style. Mirrored lenses come in various colors such as silver, blue, green, or gold, and can provide a unique and eye-catching look that complements a round face shape.

Remember, these are general suggestions and individual preferences may vary. Ultimately, choose colors and patterns that you feel confident wearing and that match your personal style and outfit choices. Trying on different options and seeking the opinion of friends or eyewear professionals can also help you find the perfect sunglasses that complement your round face shape.

Are there any safety precautions I should take when using 20 gauge staples?

Yes, when using 20 gauge staples or any type of stapler or staple gun, it’s important to observe proper safety precautions to prevent accidents or injuries.

Here are some safety guidelines to consider:

Read the Manual: Familiarize yourself with the manufacturer’s instructions and guidelines provided in the manual for the specific stapler or staple gun you are using. Follow all safety recommendations and operating procedures outlined in the manual.

Wear Personal Protective Equipment (PPE): Use appropriate personal protective equipment, such as safety glasses or goggles, to protect your eyes from potential flying debris or staple fragments. Depending on the application, you may also need to wear gloves or other protective gear.

Keep Hands Clear: Keep your hands away from the staple ejection area. Never place your fingers or hands in front of the stapler or staple gun while it is loaded or being operated.

Proper Tool Handling: Handle the stapler or staple gun with care and maintain a firm grip. Avoid pointing the tool at yourself or others, and always keep it pointed away from your body and other people.

Staple Placement: Ensure that the staple is properly aligned with the material you are fastening. Avoid stapling too close to the edges of the material to prevent the staple from tearing through or causing damage.

Secure Workpiece: Secure the workpiece properly to prevent it from moving or slipping during stapling. This will help ensure accurate staple placement and prevent accidents.

Disconnect Power: If using a powered stapler or staple gun, disconnect the power source (e.g., unplug the tool or remove the battery) when not in use or during maintenance to prevent accidental discharge.

Clear Jammed Staples Safely: If a staple gets jammed, do not attempt to clear the jam with your fingers. Follow the manufacturer’s instructions to safely clear the jam using the appropriate procedures and tools provided.

Store Safely: When not in use, store the stapler or staple gun in a safe and secure place, out of reach of children or unauthorized individuals.

Remember, the specific safety precautions may vary depending on the stapler model and application. Always refer to the manufacturer’s guidelines and use common sense when operating any stapling tool to ensure your safety and the safety of others.

What are some common injuries or accidents that can occur when using a staple gun?

When using a staple gun, 20 gauge staples there is a potential for accidents or injuries if proper safety precautions are not followed.

Here are some common injuries or accidents that can occur when using a staple gun:

Puncture Injuries: The most common injury associated with staple guns is puncture wounds. Accidental contact with the staple ejection area or improper handling can result in staples penetrating the skin, causing cuts or punctures. This can happen if fingers, hands, or other body parts are in the path of the staple discharge.

Eye Injuries: Without proper eye protection, there is a risk of staple fragments, debris, or rebounding staples causing eye injuries. Staples can ricochet off hard surfaces or break apart upon impact, posing a hazard to unprotected eyes.

Misfiring or Accidental Discharge: Improper use, unintentional trigger activation, or equipment malfunction can lead to misfiring or accidental staple discharge. This can result in unintended staples being fired, potentially causing injury to the user or bystanders.

Jamming and Staple Malfunction: Staple guns can sometimes experience staple jams or malfunctions, which may require clearing or maintenance. If not addressed properly, attempting to clear a jam or fix a malfunction can lead to accidental staple discharge or injury.

Electric or Pneumatic Hazards: Powered staple guns pose additional risks related to the power source, such as electrical shock or compressed air hazards. Care must be taken to ensure proper grounding, safe electrical connections, and appropriate handling of pneumatic equipment.

Finger or Hand Injuries: Careless handling or accidental trigger activation can result in finger or hand injuries. Pinching or crushing injuries can occur when fingers or hands are caught in the stapler mechanism during operation, reloading, or maintenance.

Material Damage or Project Failure: Insufficient staple depth or improper staple placement can result in staple failure or damage to the workpiece. This can lead to project failure, compromised structural integrity, or the need for additional repairs.

To prevent these injuries or accidents, it is crucial to follow proper safety procedures, wear appropriate personal protective equipment, use the correct staple size and type for the application, maintain the tool according to the manufacturer’s guidelines, and exercise caution during operation and maintenance.

What are the advantages of using stainless steel staples over galvanized steel staples?


Using stainless steel staples instead of galvanized steel staples offers several advantages:

Corrosion Resistance: Stainless steel staples are highly resistant to corrosion, making them ideal for outdoor or high-moisture applications. They can withstand exposure to moisture, humidity, and different weather conditions without rusting or deteriorating. Galvanized steel staples, although also corrosion-resistant, may eventually develop rust over time.

Longevity: Stainless steel staples have a longer lifespan compared to galvanized steel staples. Their corrosion resistance ensures that they maintain their strength and integrity over an extended period, even in challenging environments. This longevity makes stainless steel staples a cost-effective choice in the long run, as they don’t need frequent replacements.

Aesthetics: Stainless steel staples offer a more visually appealing option, especially in applications where the staples are visible. They have a sleek and polished appearance that can enhance the overall aesthetic of the project. Galvanized steel staples, on the other hand, have a duller and less visually appealing look.

Strength and Durability: Stainless steel staples are known for their strength and durability. They have excellent tensile strength and can withstand higher levels of stress and pressure without bending or breaking. This makes them suitable for applications that require reliable and long-lasting fastening, such as construction, woodworking, or marine projects.

Compatibility with Different Materials: Stainless steel staples are compatible with a wide range of materials, including wood, fabric, plastic, and more. They can be used in various applications, such as upholstery, carpentry, roofing, and outdoor projects. The corrosion resistance of stainless steel ensures that it won’t react with or damage the materials it is fastening.

Hygienic and Food-Safe: In certain applications, such as the upholstery of furniture or the installation of food-related equipment, stainless steel staples are preferred for their hygienic properties. They are easy to clean, do not harbor bacteria or contaminants, and are considered food-safe.

While stainless steel staples offer these advantages, it’s important to note that they are generally more expensive than galvanized steel staples. The specific requirements of your project,20 gauge 7/16 crown staples including the environment and the intended use of the staples, will help determine whether the benefits of stainless steel staples justify the higher cost.

What are the main disadvantages of using galvanized steel staples instead of stainless steel staples?

While galvanized steel staples have their uses and advantages, they also come with a few disadvantages compared to stainless steel staples.

Here are some of the main disadvantages:

Limited Corrosion Resistance: Galvanized steel staples are coated with a layer of zinc to provide some level of corrosion resistance. However, over time, this coating can wear off, exposing the underlying steel to moisture and other corrosive elements. As a result, galvanized steel staples are more prone to rust and corrosion compared to stainless steel staples.

Reduced Lifespan: Due to the inherent corrosion susceptibility of galvanized steel staples, their lifespan is generally shorter than that of stainless steel staples. In environments with high humidity, exposure to moisture, or harsh weather conditions, galvanized steel staples may deteriorate more quickly, leading to potential failure or the need for frequent replacements.

Aesthetics: Galvanized steel staples have a dull, gray appearance. In applications where aesthetics are a consideration, such as upholstery or visible woodworking projects, the appearance of galvanized staples may be less desirable compared to the sleek and polished look of stainless steel staples.

Lower Tensile Strength: Galvanized steel staples typically have lower tensile strength compared to stainless steel staples. This means they may be more prone to bending or breaking under high stress or pressure. If your project requires strong and durable fastening, galvanized steel staples may not be as reliable as their stainless steel counterparts.

Limited Compatibility with Certain Environments: Galvanized steel staples may not be as suitable for certain environments or specific applications. For example, in marine or coastal areas where the staples are exposed to saltwater, galvanized steel may not provide sufficient protection against corrosion. Similarly, in applications where hygiene or food safety is a concern, stainless steel staples are often preferred due to their easy cleaning and food-safe properties.

Despite these disadvantages, galvanized steel staples still have their place in various applications, particularly in indoor or less corrosive environments. They can be a cost-effective option for projects that don’t require long-term durability or exposure to harsh conditions. However, for applications where corrosion resistance, longevity, and higher strength are crucial, stainless steel staples are generally the preferred choice.

What are some tips for maintaining and caring for a purple bedding set?


To keep your purple bedding set looking fresh, vibrant, and in good condition,

Here are some tips for maintenance and care:

Follow Washing Instructions: Always refer to the manufacturer’s washing instructions provided with your bedding set. Different materials and fabrics may require specific care methods. Follow the recommended washing temperature, use mild detergents suitable for the fabric, and avoid using harsh chemicals or bleach that could fade or damage the color.

Separate Colors: When washing your purple bedding set, separate it from other laundry items to prevent color bleeding or transfer. Wash it with similar colors or use color-catching sheets or laundry pods to absorb any loose dyes and prevent them from staining other items.

Pre-Treat Stains: If you notice any stains on your purple bedding set, pre-treat them before washing. Use a stain remover or a mixture of mild detergent and water to gently blot or treat the stain. Avoid rubbing vigorously as it may damage the fabric.

Gentle Washing: Opt for a gentle or delicate cycle when washing your purple bedding set. Use a mild detergent and avoid using fabric softeners, as they can leave residues that may affect the fabric’s color and texture.

Avoid Overloading: Avoid overloading your washing machine when laundering your bedding set, as it can lead to inadequate cleaning and cause undue stress on the fabric. Allow enough space for the bedding to move freely in the machine.

Drying: Check the care instructions for the recommended drying method. Some bedding sets can be tumble dried on low heat, while others may require air drying. Avoid exposing the bedding set to direct sunlight for extended periods, as it can cause fading.

Ironing: If necessary, iron your purple bedding set following the fabric’s care instructions. Use a low heat setting and iron the fabric on the reverse side to prevent direct contact with the iron.

Storage: When not in use, store your purple bedding set in a cool, dry place. Avoid storing it in plastic bags or containers that can trap moisture and potentially lead to mildew or odors. Instead, use breathable storage bags or keep the bedding set folded neatly in a linen closet or drawer.

Regular Cleaning: To maintain freshness, consider regularly airing out your purple bedding set. Open windows or use a fan to circulate air in the bedroom, which helps eliminate odors and keeps the fabric fresh between washes.

By following these care tips, you can help extend the lifespan of your purple bedding set and keep it looking vibrant and inviting for a longer time.

What are some common mistakes to avoid when caring for a purple bedding set?

When caring for a purple bedding set, it’s important to avoid certain common mistakes that could potentially damage the fabric or affect its appearance.

Here are some mistakes to avoid:

Using Harsh Cleaning Agents: Avoid using harsh cleaning agents, bleach, or strong detergents when washing your purple bedding set. These can fade the color, weaken the fabric, purple bedding set or leave behind residues that affect the texture and appearance.

Overloading the Washing Machine: Overloading the washing machine with too many bedding items can lead to insufficient cleaning and strain on the fabric. It’s important to give the bedding set enough space to move freely in the machine for effective cleaning.

Ignoring Stains or Spills: Promptly address any stains or spills on your purple bedding set. Ignoring them or allowing them to set can make them more difficult to remove later. Treat the stains as soon as possible using appropriate stain removal methods.

Skipping Pre-Treatment: Pre-treat stains before washing your purple bedding set. Skipping this step can result in stains becoming more stubborn and harder to remove during the wash cycle.

Exposing to Direct Sunlight: Avoid prolonged exposure of your purple bedding set to direct sunlight. UV rays can fade the color over time, leading to a dull appearance. If possible, hang the bedding to dry in a shaded area or use a dryer instead of sun-drying.

Using Excessive Heat: Be cautious when using heat for drying or ironing your purple bedding set. Excessive heat can damage the fabric, cause shrinkage, or lead to color fading. Follow the recommended heat settings provided in the care instructions.

Neglecting Regular Cleaning: Regularly launder your purple bedding set to maintain its freshness and cleanliness. Neglecting regular cleaning can result in the buildup of dirt, oils, and odors that are harder to remove later.

Storing in Plastic Bags: Avoid storing your purple bedding set in plastic bags or containers. Plastic can trap moisture, leading to the growth of mold or mildew and causing unpleasant odors. Instead, opt for breathable storage bags or keep the bedding set neatly folded in a cool, dry place.

Using Fabric Softeners Excessively: While fabric softeners can impart a pleasant scent and softness to your bedding, excessive use can reduce the absorbency of the fabric and create a waxy residue. Use fabric softeners sparingly or opt for alternatives like dryer balls or vinegar rinses.

By avoiding these common mistakes, you can help preserve the appearance, color, and quality of your purple bedding set for a longer time. Always refer to the specific care instructions provided by the manufacturer for the best practices in maintaining your bedding.

Are there any specific types of staples that are more prone to jamming issues?

There are some types of wholesale staples that are slightly more prone to jamming issues than others:

Low crown staples

Staples with a very narrow crown (1/8″ or less) can jam more easily since there is little clearance between the head and the stapler anvil/chuck.

Thin wire staples

Very thin gauge staples made of finer wire may be more prone to buckling or jamming during firing. Heavier gauges are sturdier.

Curved/bent staples

Any staples that are pre-formed with a bend or hook shape can inadvertently snag or hang up inside the stapler mechanism.

Overly long staples

Extra long staples may jam if the legs or crown protrude too far beyond the mouth/throat plate area of the stapler.

Blunt/mushroomed staples

Staples that have become dented, mushroomed or otherwise deformed on their tips can catch more readily.

Damaged or inferior staples

Staples made of poor quality metal or that have factory defects like burrs are at higher risk.

Missized staples

Using staples that are too large or don’t properly match the stapler throat size rating can lead to hangs.

Proper staple selection and regular maintenance/clearing of any built-up debris in the stapler helps reduce potential jams.

Why Toy Manufacturers Prefer Custom Silicone Keypads

Toy manufacturers often prefer custom silicone keypads for a variety of reasons.

Here are some of the main reasons why toy manufacturers prefer custom silicone keypads:

Durability: Silicone keypads are highly durable and can withstand prolonged use, making them ideal for use in toys that are designed to be played with frequently.

Customization: Custom silicone keypads can be designed to fit the specific needs of each toy, including the number and arrangement of buttons and the shape and size of the keypad. This allows toy manufacturers to create unique and innovative designs that stand out in the market.

Tactile Feedback: Silicone keypads provide tactile feedback when pressed, giving users a more satisfying and responsive user experience. This is especially important for toys that require button inputs, such as game controllers or musical instruments.

Waterproofing: Silicone keypads are highly resistant to water and moisture, making them ideal for use in toys that may be exposed to water or other liquids.

Design Flexibility: Silicone keypads can be molded into a wide range of shapes and sizes, allowing for greater design flexibility. This makes it easier for toy manufacturers to create toys with unique shapes and designs that are more appealing to consumers.

Low Cost: Custom silicone keypads are typically less expensive than other types of keypads, such as membrane keypads or mechanical keypads. This can help toy manufacturers keep production costs down and make their toys more affordable for consumers.

Overall, custom silicone keypads offer a range of benefits that make them an ideal choice for toy manufacturers. Their durability, customization options, tactile feedback, waterproofing, design flexibility, and affordability all contribute to making them a popular choice for toys and other consumer products.

How do custom silicone keypads compare to other types of keypads in terms of lifespan?

Custom silicone keypads are known for their durability and long lifespan compared to other types of keypads.

Here are some ways that custom silicone keypads compare to other types of keypads in terms of lifespan:

Mechanical Keyboards: Mechanical keyboards are known for their durability and long lifespan, but they can be expensive. Custom silicone keypads are less expensive and can also last a long time, making them a more cost-effective option in many cases.

Membrane Keyboards: Membrane keyboards are less expensive than mechanical keyboards, but they are also less durable. The thin membrane layer can wear out over time, leading to a shorter lifespan. custom silicone keypad Custom silicone keypads are more durable than membrane keyboards and can last for many years with proper care.

Rubber Keypads: Rubber keypads are also durable, but they can be prone to wearing out over time, especially if they are used frequently. Custom silicone keypads are more resistant to wear and tear than rubber keypads and can last longer as a result.

Overall, custom silicone keypads are known for their long lifespan and durability compared to other types of keypads. While mechanical keyboards are also durable, they can be expensive, making custom silicone keypads a more cost-effective option. Membrane keyboards and rubber keypads are less durable than custom silicone keypads, making them more prone to wear and tear over time.

How can I properly care for my custom silicone keypad to ensure a long lifespan?

Proper care of your custom silicone keypad can help ensure a long lifespan and optimal performance.

Here are some tips for caring for your custom silicone keypad:

Keep it clean: Regularly clean your keypad with a soft, lint-free cloth and a mild soap solution to remove any dirt, dust, or other debris that may accumulate on the surface. Avoid using abrasive cleaners or solvents that may damage the surface.

Avoid harsh environments: Silicone keypads are resistant to water and moisture, but they can still be damaged by exposure to extreme temperatures, chemicals, or other harsh environments. Avoid exposing your keypad to excessive heat, cold, or humidity, as well as any chemicals or solvents that may damage the surface.

Avoid excessive force: While silicone keypads are durable, they can still be damaged by excessive force or pressure. Avoid pressing too hard on the buttons or using sharp or pointed objects to press the buttons, as this can cause damage to the surface.

Store properly: When not in use, store your keypad in a cool, dry place where it is not exposed to direct sunlight or extreme temperatures. Avoid storing it near any chemicals or solvents that may damage the surface.

Inspect regularly: Regularly inspect your keypad for any signs of wear or damage, such as cracks, tears, or fading. If you notice any issues, stop using the keypad immediately and contact the manufacturer for assistance.

By following these tips, you can help ensure a long lifespan and optimal performance for your custom silicone keypad. Regular cleaning, avoiding harsh environments and excessive force, proper storage, and regular inspections can all help keep your keypad in good condition and functioning properly for years to come.

Learn How to Print on black silicone tubing, Jewelry and Parts

Printing on black silicone tubing, jewelry, and parts can be a bit challenging due to the dark color of the material. However, there are a few techniques that can be used to achieve high-quality prints.

Here are some steps to follow when printing on black silicone tubing, jewelry, and parts:

Pre-Treatment: Before printing on black silicone tubing, jewelry, or parts, it is essential to prepare the surface. This can be done by cleaning the surface with a lint-free cloth and alcohol to remove any oils or debris that may interfere with the printing process.

Printing Method: There are several printing methods that can be used to print on black silicone tubing, jewelry, and parts, including pad printing, screen printing, and laser printing. Each method has its advantages and disadvantages, so it is essential to choose the method that is best suited for the specific application.

Ink Selection: When printing on black silicone tubing, jewelry, and parts, it is essential to use the right ink. The ink should be formulated specifically for use with silicone materials and should be able to adhere to the surface without smudging or fading.

Curing: After printing, the ink must be cured to ensure that it adheres properly to the surface. The curing time and temperature will depend on the type of ink used and the printing method. It is essential to follow the manufacturer’s instructions for curing to ensure optimal results.

Post-Treatment: After curing, the printed surface should be inspected for any defects or imperfections. If necessary, the surface can be treated with a sealant or coating to protect the print from fading or rubbing off.

In summary, printing on black silicone tubing, jewelry, and parts requires careful preparation, ink selection,black silicone tubing and curing to ensure optimal results. By following these steps and using the right equipment and materials, it is possible to achieve high-quality prints that are durable and long-lasting.

What are some common defects or imperfections to look out for after printing?

After printing on black silicone tubing, jewelry, and parts, it is essential to inspect the surface for defects or imperfections.

Here are some common defects or imperfections to look out for:

Smudging: Smudging can occur when the ink is not fully cured or when the surface is not adequately pre-treated. Smudging can result in a blurry or distorted image.

Fading: Fading can occur over time due to exposure to sunlight or other environmental factors. Fading can result in a loss of color or clarity in the print.

Rubbing Off: The ink can rub off the surface if it is not adequately cured or if the surface is subjected to high levels of friction. Rubbing off can result in a loss of detail or legibility in the print.

Bleeding: Bleeding can occur when the ink spreads beyond the intended area. This can happen if too much ink is applied or if the surface is not level.

Under-Curing: Under-curing can occur when the ink is not exposed to the correct temperature or for the correct amount of time. Under-curing can result in a lack of adhesion between the ink and the surface.

Over-Curing: Over-curing can occur when the ink is exposed to too much heat or for too long. Over-curing can result in a brittle or cracked surface.

Unevenness: Unevenness can occur when the ink is not applied evenly or when the surface is not level. Unevenness can result in a distorted or uneven print.

In summary, there are several common defects or imperfections to look out for after printing on black silicone tubing, jewelry, and parts. By inspecting the surface for these defects and taking steps to prevent them, it is possible to achieve high-quality prints that are durable and long-lasting.

How often should I use wet wipes on my baby?

Wet wipes are a convenient way to clean a baby’s skin during diaper changes or for cleaning up messes during feeding or playtime. However, it is important to use them in moderation to avoid over-cleaning or irritating the baby’s delicate skin.

Here are some guidelines for using wet wipes on a baby:

Use during diaper changes: Wet wipes can be used during each diaper change to clean the baby’s bottom and genital area. Make sure to use enough wipes to thoroughly clean the area, but avoid over-cleaning or scrubbing too hard, as this can cause irritation.

Use for messes: Wet wipes can also be used for cleaning up messes during feeding or playtime. Use them as needed to clean the baby’s skin, but again, avoid over-cleaning or scrubbing too hard.

Use sparingly: While wet wipes can be convenient for cleaning a baby’s skin, it is best to use them in moderation to avoid over-cleaning or irritating the skin. In general, it is recommended to use wet wipes only when necessary and to use a damp cloth or warm water for routine cleaning.

Choose gentle wipes: When choosing wet wipes for a baby, look for wipes that are gentle and free from harsh chemicals or fragrances. This can help minimize the risk of skin irritation or allergic reactions.

Overall, it is important to use wet wipes on a baby’s skin in moderation and to choose gentle wipes that are free from harsh chemicals or fragrances. By using wet wipes properly and sparingly, China Wet wipes for baby manufacturer you can help keep your baby’s skin clean and healthy.

What are some alternatives to wet wipes for cleaning my baby?

Wet wipes can be convenient for cleaning a baby’s skin, but there are also some alternatives that are more eco-friendly and gentle on a baby’s delicate skin.

Here are some alternatives to wet wipes for cleaning your baby:

Cloth wipes: Cloth wipes are reusable and can be washed and reused over and over again. They are gentle on a baby’s skin and can be used with warm water or a gentle, natural cleanser.

Warm water and a washcloth: Warm water and a washcloth can be very effective in cleaning a baby’s skin. Simply wet the washcloth with warm water and use it to clean the baby’s skin. This is a gentle and eco-friendly alternative to using wet wipes.

Natural baby cleansers: There are many natural baby cleansers available that are gentle on a baby’s skin and can be used for cleaning. Look for cleansers that are made with natural ingredients and free from harsh chemicals or fragrances.

Bidet: A bidet is a plumbing fixture that is designed to wash and clean the genital area after using the toilet. It uses a stream of water to clean and can be a more effective and hygienic alternative to wet wipes.

Baby powder: Baby powder can be used to absorb moisture and prevent diaper rash. Simply sprinkle a small amount of baby powder onto the baby’s skin after cleaning.

By using these alternatives to wet wipes, you can reduce waste and minimize your impact on the environment while still keeping your baby’s skin clean and healthy.